FRZ Zone Recovery Hedging EA is an expert adviser that you can use to design and implement automated hedging strategies. Please note hedging is a risky strategy and make sure you properly understand the risks involved. Please read the product page for details on hedging strategies. Please do your backtesting/demo testing before using real money.
Installation Steps
1. Go to MT4 => Options=>Expert Advisers and allow automated trading, DLL imports, and Web Requests and add https://frzserver.com as an allowed URL.
2. Place the EA file in the Experts folder of your MT4
3. Refresh/restart MT4
4. Open your trading chart and load the EA
5. Set your entry method, initial lot size, hedge recovery zone, take profit and cost/profit factor
5. If you use cloud-based entry, then update prefix/suffix if your pair names have them.
6. Now add more pairs in the same way as necessary.
Video – Basic Setup
Settings
Setting Explanations
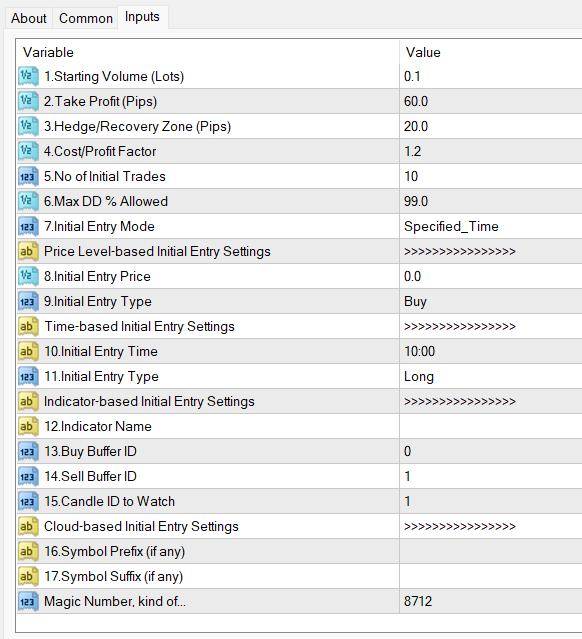
1. Starting Volume (Lots): Here you can set the starting volume. Unless you have a huge capital, we recommend you start with the lowest lot size allowed such as 0.01. This is because you may have additional trades with martingale functionality if the market is consolidating.
2. Take Profit (Pips): This is the target take profit distance in pips.
3. Hedge/Recover Zone: This is the hedging distance, a kind of stop-loss. Make sure you have a good Risk to Return ratio so that the need for the martingale functionality would be less.
4. Cost/Profit Factor: In a perfect scenario without spreads, swaps, commissions, and slippage, a cost/profit factor of 1 will make you break even. However, you may need to increase this factor if you want to break even with them depending on your broker. For instance, a factor of 1.1 would be enough to cover the trading costs. However, if you want to have some kind of profit after each hedge completion, you may want to increase this factor further. It is recommended that you do your backtesting before you decide the best factor here.
5. No of Initial Trades: This is applicable to indicator-based and cloud-based initial entries or hedging rounds only. The EA will only make this number of initial trades. Please note after an initial trade, the EA may open further trades based on the recovery zone until one of the trades reaches the take profit (a hedging round).
6. Max DD % Allowed: Here you can set the max drawdown you would allow. For instance, if you put 50 here when the equity-based drawdown reaches 50% all the trades will be closed and no new trades will be made. Hedging strategies can have higher drawdowns, make sure you have set a reasonable DD limit.
7. Initial Entry Mode: Entering the initial trade is crucial for the success of hedging strategies. You should avoid ranging markets at all costs, which would open too many trades under Martingale and blow your account.
In our EA you have four options to set the first entry.
- Manual Entry method – you can use the trading buttons on the screen to enter your initial trade.
- Specified Price Entry- you can set a specified price to enter the initial trade.
- Specified Time Entry- you can set a specified time to enter the initial trade. For instance, you can set the London open time as the initial trade entry.
- Indicator-based Entry – If you have any indicator that provides some kind of buy and sell signals such as arrows, you can use them also to make the first entry.
- Cloud-based Entry – Here our cloud-based server will decide the initial entry time. This does not work in backtesting and also it works on forex pairs only. We recommend the M15 timeframe for this entry method.
8-9. Specified Price-based Initial Entry: You can set the entry price and the type of trade you want to enter.
10-11. Specified Time-based Initial Entry: You can set the entry time and the type of trade you want to enter. For instance, you can set the EA to enter the initial trade on London Open time.
Indicator-based Initial Entry: If you selected indicator-based initial entry, then you need to set up your indicator under setting 12-15.
12. Indicator Name: You need to have the indicator name exactly as per the indicator file name (no need to have the ex4 file extension). Further, if your indicator is NOT directly within the MT4 indicators folder (i.e. if it is in a subfolder within the main MT4 Indicators folder), you need to add the indicator name along with the folder path. For instance, if your indicator name is “Candle Stick Reversal Indicator” and the indicator is located in the “Market” sub-folder within the main MT4 Indicators folder then you need to enter the indicator name as follows:
Market/Candle Stick Reversal Indicator
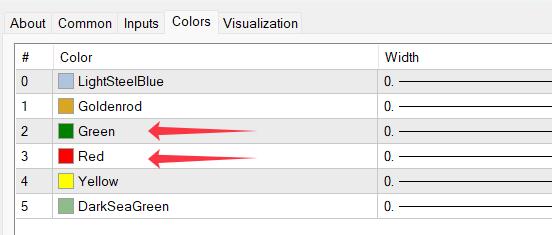
13-14. Buy/Sell Buffer IDs: You need to identify the correct buffer/color IDs for the buy and sell signals respectively.
For instance, given below is the colors tab of an indicator settings. This indicator makes green and red arrows on the chart for buy and sell signals. We can recognize color/buffer ID 2 for buy and 3 for sell. These should be added under settings 13 & 14 respectively.
15. Candle ID to Watch: This is the candle ID that the EA looks for possible signals. “0” means the current forming candle and “1” means the previously completed candle and so on. For instance, if you have “1” here, the EA will always look at the immediately completed candle for any buy or sell signals. Most indicators tend to repaint within the current candle and therefore you need to be careful in using “0” here. If your indicator is heavily repainting, then you may consider increasing the candle ID. However, on the other hand, this may lead to delayed trade entries.
Settings for Could-based Initial Entry: If you use this option, the EA will use our cloud-based signals to enter the initial trade. We recommend M15 charts for this and this works only on forex pairs involving major currencies (28 pairs). Also, you need to update setting 16 and 17 if your pair names have prefixes or suffixes.
16. Symbol Name Prefix: If our prop firm’s currency pair names include a prefix, you need to add it under Settings 6. If your prop firm’s pair names have no such prefix, you can simply keep this setting blank.
- Example prefixes deEURUSD, dmEURUSD, m.EURUSD => In these cases de, dm, m. should be added under setting 6.
17. Symbol Name Suffix: If our prop firm’s currency pair names include a suffix, you need to add it under Settings 7. If your prop firm’s pair names have no such suffix, you can simply keep this setting blank.
- Example suffixes: EURUSD.cc, EURUSDcash, EURUSDm => In these cases .cc, cash, m should be added under setting 7.
If your pair name has both prefixes and suffixes, you need to add them under both prefix/suffix settings.