FRZ Breakout Scalper is an expert adviser (EA) that trades quick price breakouts. The logic behind it is simple. It looks at the speed of the price movements to make entries. For instance, if the price goes up by 5 pips in 5 seconds, then EA can recognize it as a bullish breakout and would place a buy trade. You can customize the exact recognition criteria for breakouts under settings.
Note 1: We recommend an ECN/raw spread broker with a VPS with a latency to your broker’s server. Otherwise, you are likely to get large slippages.
Note 2: Stop loss & take profit are virtual; you will not see them on chart.
Note 3: Entry optimization (Dollar Cost Averaging) is on by default. This will make more than one trade for any entry if prices reaches the SL (Trades are not closed on SL). You can disable this under Setting.
| Product name | FRZ Breakout Scalper |
| Platform supported | MT4/MT5 |
| Time frames supported | One-minute chart (free) Any timeframe (Pro). However, timeframe might not have much impact on the performance. |
| Supported pairs | EA can work with any forex & metal pair. Please test with free version for other pairs. |
| Lot sizing | 0.01 lot for each $200 in the account per pair (Aggressive mode) 0.01 lot for each $500 in the account per pair (Normal Mode) Above are considering 500:1 leverage |
| Minimum deposit | Minimum $200 (on 500:1 leverage) |
| Recommended broker | Any broker with low spread (ECN/Raw spread account is necessary). We can recommend ICMarkets. |
EA Settings
Settings Explanations:
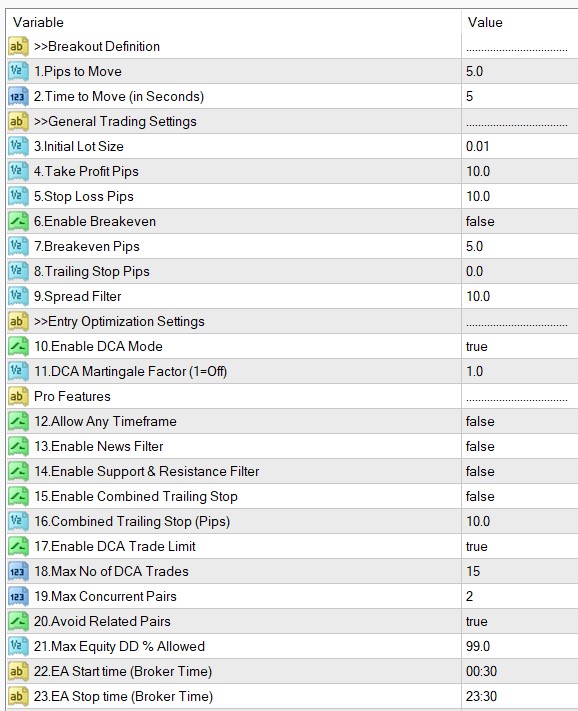
>>Breakout Definition
1. Pips to Rise
2. Time to Rise (Seconds)
These are the two settings that define a breakout. Pips to move and time to move. For instance, If you have 5 (pips) in Setting 1 and 5 (Seconds) in Setting 2, that means whenever the price goes up or down minimum 5 pips within 5 seconds or less, then the EA recognizes it as a bullish or a bearish breakout and enters a buy or sell trade depending on the case. Thus, if you want to increase the trades, you can either decrease the pips or increase the time or do both (Also if you want to decrease the trading, do the opposite).
>>General Trading Settings
Please note, take profit and stop loss are virtual, and you can not see them on the chart.
3. Initial Lot Size – This is the lot size. If you use the DCA mode, then this will be the initial lot size and additional DCA trades may have different lot sizes depending on the martingale factor.
4. Take Profit Pips – Take profit is virtual, and you can not see it on the chart as a horizontal line.
5. Stop Loss Pips – Stop loss is virtual, and you can not see it on the chart as a horizontal line.
6. Enable Breakeven – you can enable breakeven level here
7. Breakeven Pips – you can set the breakeven level in pips here
8. Trailing Stop Pips – optionally, you can set a trailing stop here (in pips). 0 here means no trailing stop.
9. Spread Filter – If the current spread is above this level, then the EA will not enter trades.
>>Entry Optimization Settings
10. Enable DCA Mode – here you can enable or disable the DCA (Dollar Cost Averaging) mode. It is on by default. If you use DCA mode, EA will not close the trade when price reaches stop loss. Instead, the EA will keep adding new positions (subject to some other rules other than the stop loss level) and the take profit will be adjusted based on the weighted average price. Also, the EA may close the trades at breakeven if the DCA mode opens more than 4 trades in order to minimize the risk.
11. DCA Martingale Factor (1=Off) – You can optionally add martingale to the DCA trades. For instance, if you have 2 here, then it means, each new trade on the DCA mode will have the volume multiplied by 2. If the first trade was 0.1 lot, then the second trade will be 0.2, the third 0.4 and so on. If the martingale factor is 1, then there will be no multiplication and the lot size will be the same for all trades.
>> Pro Features (These settings are disabled on the free version)
12. Allow Any Timeframe – The free version will work only on one minute chart. If you enable it here, the EA will run on any timeframe. However, please note the basic logic behind this EA is timeframe independent because it only looks at the price movement with a specified period of time, which is technically not dependent on the timeframe. However, it could be easier to see the trades on a higher timeframe and sometimes results may sometimes vary slightly on a different timeframe.
13. Enable News Filter – You can enable or disable news filter here. Please note that the news filter does not work on the back tester. If enabled, the EA will not take trades during high impact news times. However, please understand that news often creates quick sudden moves that could otherwise create trading opportunities. However, some brokers may not allow trading news or prices could be highly unpredictable during such time, and you may want to avoid trading news times. But, it would reduce the trading activity while positively impacting the accuracy.
14. Enable Support & resistance filter – If enabled, the EA will not take a trade when the potential take profit price falls within a resistance zone for buys and support zone for sells. This setting would likely to reduce the trading activity while positively impacting the accuracy.
15. Enable Combined Trailing Stop – This is supposed to be used along with the DCA mode. If enabled, the EA will consider the entry prices and the lot sizes of all the ongoing trades and consider a common weighted average price and then add the same trailing stop for all the trades.
16. Combined Trailing Stop (Pips) – Here you can set the combined trailing stop discussed above in pips.
17. Enable DCA Trade Limit – You can enable or disable limiting the no of trades that the EA can open under the DCA mode.
18. Max No of DCA Trades – Here you can set the maximum DCA trades here.
19. Max Concurrent Pairs – This setting controls the number of different pairs you can have concurrent trades. This is important to reduce risk if you use the EA on many different charts. For instance, you may have loaded the EA to 10 different pairs bands, then have 2 under these settings. Now, the EA will only open concurrent trades in two pairs only.
20. Avoid Related Pairs – This is another settings where you can control the risk. If you have enabled this, and you have used the EA on many charts, the EA will not open simultaneous trades on related pairs. For instance, if you have a trade on EURUSD, then the EA will not open another trade on any other pair that has either EUR or USD.
21. Max Equity DD % Allowed – Here you can set an equity based stop loss. This is more useful to control risk when you use the DCA mode. For instance, if you put 20 here, then EA will close all the trades when the equity based drawdown reaches 20%, and it will stop trading thereafter.
22-23. EA Start – Stop Time – Here you can set a time for the EA to work. For instance, if you want to EA to trade only during the London Session, you can set the London open and close times as per your broker. Please note, the time here is your Meta Trader time. Please note, this time limit only applies to the initial trade when you have DCA mode enabled. That means that the EA may open DCA trades even outside this time period.