
FRZ Extreme Reversal System – User Manual
- Related Product: FRZ Extreme Reversal System
- Browse Similar Tools: Trading Systems & Strategies
- Before You Start
- Installation
- Quick Specifications
- HUD / On-Chart Panel
- Chart Drawings
- Market Scanner
- Trade Buttons
- Input Settings
- Set Files
- Troubleshooting
- Support Links
Before You Start
- The system is an Expert Advisor (EA): it is installed in the Experts folder and attached from the Navigator’s Expert Advisors list, not the Indicators list.
- It never opens a trade by itself. It draws the bands and reversal arrows and scans other pairs; trades are opened only when you click a button.
- Enable AutoTrading (MT4) or Algo Trading (MT5) so the buttons can place trades.
- It is free. It needs no license and no extra indicator or template files – everything is calculated inside the EA. If you used the previous version, remove its indicators and template from your charts.
- Recommended chart: H4. The extreme zones are then read from the D1 bands. This is a swing system: expect only a few arrows per pair each month.
- One EA per chart. MetaTrader allows only one EA on a chart, so use a separate chart if you run another EA on the same pair.
- Optional: to receive update notices on the chart, add
https://frzserver.comin Tools > Options > Expert Advisors > Allow WebRequest for listed URL. Without it the EA works normally. - Practise on a demo account before trading live.
Installation
MT4 Installation
- Download the MT4 version and unzip it.
- In MT4, click File > Open Data Folder and copy the
.ex4file into MQL4/Experts. - Restart MT4, or right-click Expert Advisors in the Navigator panel and select Refresh.
- Open an H4 chart of the pair you want to trade and drag the EA onto it. On the Common tab, tick Allow live trading.
- Click the AutoTrading button on the toolbar so it turns green.
MT5 Installation
- Download the MT5 version and unzip it.
- In MT5, click File > Open Data Folder and copy the
.ex5file into MQL5/Experts. - Restart MT5, or right-click Expert Advisors in the Navigator panel and select Refresh.
- Open an H4 chart of the pair you want to trade and drag the EA onto it. On the Common tab, tick Allow Algo Trading.
- Click the Algo Trading button on the toolbar so it turns green.
When attached, the EA applies the FRZ chart colours and draws the bands, arrows, panel, buttons and scanner. When you remove it, all its drawings are removed.
Quick Specifications
| Product name | FRZ Extreme Reversal System |
| Platform supported | MT4 & MT5 |
| Timeframes supported | Any timeframe below the Higher Timeframe (setting 5, default D1) – H4 recommended |
| Trading pair(s) | Any symbol, one chart per symbol – major forex pairs recommended. The scanner watches up to 30 more symbols from the same chart. |
| Suitable market sessions | Any – arrows are checked when each H4 candle closes |
| Recommended min. deposit | You choose the lot size (or risk %) for every trade. $500 or more with 0.01 lots is sensible, because H4 swing stop losses are often 30-120 pips. You can use cent accounts as well. |
| Minimum leverage | The higher, the better – use the highest leverage available. However, 1:100 can be recommended as the bare minimum. Consider increasing your deposit if your leverage is only at the bare minimum. |
| VPS requirement | This software needs to run 24/7. A Windows VPS is recommended unless you can keep your own PC running continuously 24/7 – For a VPS, we can recommend this VPS provider. You can purchase the cheapest VPS Windows package with this provider (4GB RAM is usually enough as a minimum). More instructions on buying and setting up VPS are given on our VPS page. |
| Recommended broker | EA works on any broker that offers MetaTrader. However, we can recommend ICMarkets and if it is not available for your country, then we can recommend ICTrading. |
HUD / On-Chart Panel
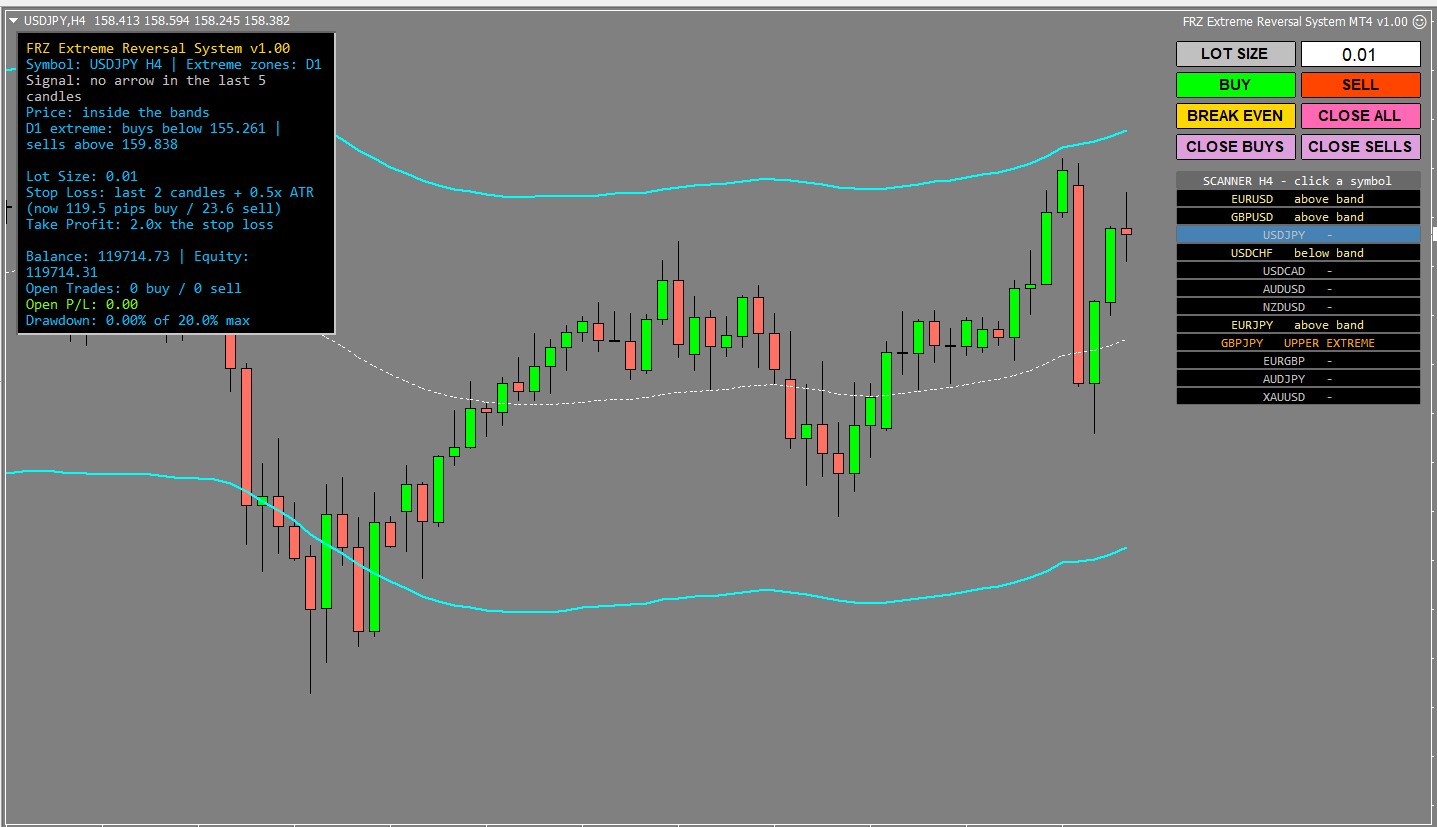
The panel at the top-left of the chart shows the signal, where price is and the trade settings. Long lines wrap onto the next line.
| HUD Item | Meaning |
|---|---|
| FRZ Extreme Reversal System v… | Product name and the version you are running. |
| Symbol … | Extreme zones … | The chart symbol and timeframe, and the higher timeframe the extreme zones come from, e.g. Symbol: USDJPY H4 | Extreme zones: D1. |
| Extreme filter off: use a chart timeframe lower than D1 (H4 recommended) | Shown in orange when the chart timeframe is the same as or higher than the Higher Timeframe (setting 5). Arrows then appear without the extreme zone check. Switch the chart to H4 (or lower). |
| Signal | Signal: BUY arrow 2 candle(s) ago (green) / SELL arrow ... (red) – the newest arrow within the last 5 closed candles.Signal: no arrow in the last 5 candles (gray) – nothing recent.Signal: loading history (orange) – MetaTrader is still downloading candles. It clears by itself. |
| Price | Where the current price is:inside the bands (blue) – no setup.below the lower band (watch for a buy) / above the upper band (watch for a sell) (khaki) – stretched, but not yet in the D1 extreme zone.below the lower band, in the D1 extreme zone (watch for a buy) / above the upper band, in the D1 extreme zone (watch for a sell) (orange) – the strongest setup. Wait for the arrow. |
| D1 extreme | The prices where the D1 extreme zones start, e.g. D1 extreme: buys below 155.261 | sells above 159.838. Buy arrows need a candle that reached the first price or lower; sell arrows need one that reached the second price or higher. See setting 6 for how they are calculated. |
| Lot Size / Risk | The value in the LOT SIZE box: Lot Size: 0.01, or Risk: 1.00% per trade when Lot Size Mode (setting 17) is Risk %. |
| Stop Loss | The stop loss method and its distance right now for a buy and a sell, e.g. Stop Loss: last 2 candles + 0.5x ATR (now 119.5 pips buy / 23.6 sell). None when setting 20 is None. |
| Take Profit | The take profit method, e.g. Take Profit: 2.0x the stop loss, middle line 157.540 or 3.0x ATR (45.2 pips). |
| Auto Break Even / Trailing Stop | Shown only when setting 27 or 28 is above 0, e.g. Trailing Stop: 2.0x ATR (30.1 pips). |
| Balance | Equity | Your account balance and equity. |
| Open Trades / Open P/L | This EA’s open trades on this chart (buys / sells) and their floating profit or loss including swap (on MT4 also commission). |
| Drawdown | The floating loss of this EA’s trades as a % of the balance, against the maximum in setting 29, e.g. Drawdown: 0.00% of 20.0% max. Orange from 75% of the maximum, red once the maximum was reached. Hidden when setting 29 is 0. |
| Last | The result of your last button click or automatic action, e.g. Last: Buy 0.02 lots opened, Last: Break even set on 1 trade(s) or Last: Max drawdown 20.0% reached - trades closed. |
Chart Drawings
| Drawing | Meaning |
|---|---|
| Aqua lines (chart bands) | The upper and lower band of the chart timeframe. They sit 2.5x the long-term average candle range (settings 2-3) above and below the middle line. Price outside a band is stretched and may turn back. The bands use only closed and current candles, so past values never change. |
| White dotted line | The middle line – a smoothed average price of the last 50 candles (setting 1). It is a common target for reversal trades (Take Profit Mode “Band Middle Line”). |
| Gold lines (D1 bands) | The same bands calculated on the Higher Timeframe (setting 5), taken from the last closed D1 candle, so they step once per day. They are much wider than the H4 bands and are often off-screen until price is very stretched. Not drawn when the chart timeframe is D1 or higher. |
| Green up / red down arrows | Reversal signals. A buy arrow appears when a candle closed below the lower band and the next candle turned up and closed back inside it (a sell arrow is the mirror image above the upper band). With setting 4 on, the candle outside the band must also have reached the D1 extreme zone. Only one arrow per band visit (setting 7). An arrow appears only after its candle has closed and never moves or disappears afterwards; the matching entry is the open of the next candle. |
Market Scanner
The scanner sits under the buttons and checks the symbols in setting 13 on the chart’s timeframe, each time one of them closes a candle. Each row shows:
| Row text | Meaning |
|---|---|
BUY 2 candles ago (green) / SELL 1 candle ago (red) |
An arrow within the last 5 closed candles (setting 15). |
LOWER EXTREME / UPPER EXTREME (orange) |
The last candle closed outside the band and reached the D1 extreme zone – an arrow may follow. |
below band / above band (khaki) |
The last candle closed outside the band, but not in the D1 extreme zone. |
- (gray) |
Price is inside the bands. |
loading history / not offered |
MetaTrader is still downloading that symbol’s candles, or your broker has no symbol with that name (check setting 14). |
Click a symbol to switch this chart to it (same timeframe). The current chart’s row is highlighted in blue. When a scanned symbol gets a new arrow, an alert is sent (setting 16). The scanner does not run in the Strategy Tester.
Trade Buttons
The buttons sit in the top-right corner. They manage only the trades this EA opened on this chart (same symbol and Magic Number).
| Button | What it does |
|---|---|
| LOT SIZE / RISK % box | Type the lot size (or, in Risk % mode, the risk % of your balance) for the next trade and press Enter. Lot sizes are rounded down to your broker’s lot step and kept between its minimum and maximum lot. An empty or 0 value uses settings 18 / 19. |
| BUY / SELL | Opens a market trade, then sets the stop loss and take profit from settings 20-26. Example (default settings): Buy on EURUSD at 1.08300 after a buy arrow. The lowest low of the last 2 closed candles is 1.08000 and the ATR is 30 pips -> stop loss 1.08000 – 15 pips = 1.07850 (45 pips). Take profit 2 x 45 = 90 pips -> 1.09200. If price has already moved beyond the swing level, the ATR stop loss (setting 22) is used instead. A level closer than your broker’s minimum stop distance is moved out to that distance. |
| BREAK EVEN | Moves the stop loss of every open trade to its entry price + 1 pip (buy) or – 1 pip (sell). Trades not yet far enough in profit for your broker’s minimum stop distance are skipped and counted in the Last row. A stop loss is never moved backwards. |
| CLOSE ALL / CLOSE BUYS / CLOSE SELLS | Closes all, only the buy, or only the sell trades of this EA on this chart at market price. |
Input Settings
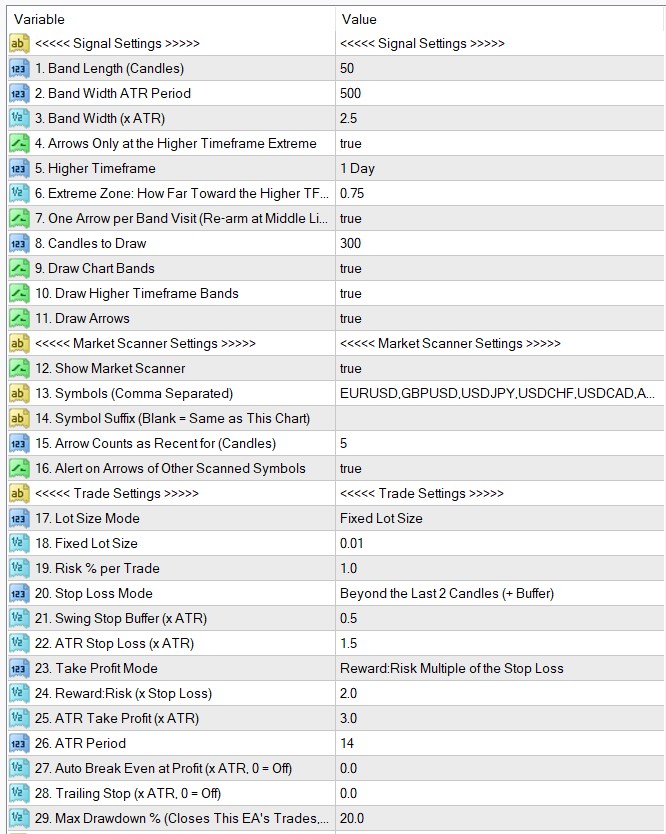
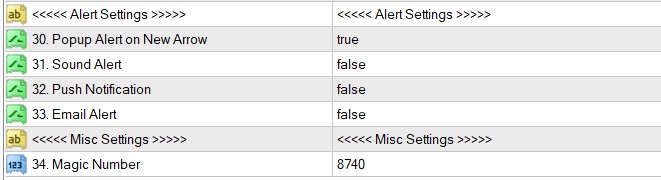
The defaults are made for H4 charts. Most traders only change the lot size or risk, the scanner symbols and the alerts.
| No. | Setting | Explanation |
|---|---|---|
| Signal Settings | ||
| 1 | Band Length (Candles) | How many candles the middle line averages. Default 50. Higher = a slower middle line. |
| 2 | Band Width ATR Period | How many candles are averaged to measure the normal candle range that sets the band width. Default 500 (a long-term average, so the bands stay steady). |
| 3 | Band Width (x ATR) | Distance of each band from the middle line, as a multiple of that average range. Default 2.5. Higher = wider bands and fewer arrows. Example: average range 20 pips, width 2.5 -> the bands sit 50 pips above and below the middle line. |
| 4 | Arrows Only at the Higher Timeframe Extreme | true (default) = an arrow needs the candle outside the band to have reached the higher timeframe extreme zone. false = every band turn gets an arrow (many more arrows, weaker on average). |
| 5 | Higher Timeframe | The timeframe of the extreme zones and gold bands. Default 1 Day. It must be higher than the chart timeframe, otherwise the filter switches off (orange row on the panel). |
| 6 | Extreme Zone: How Far Toward the Higher TF Band (0-1) | Where the extreme zone starts, as a share of the distance from the D1 middle line to the D1 band. Default 0.75. 1 = price must reach the D1 band itself (fewer arrows); 0.5 = halfway is enough (more arrows). Example: D1 middle line 1.10000, D1 lower band 1.08000, setting 0.75 -> the buy zone starts at 1.10000 – 0.75 x 0.02000 = 1.08500. |
| 7 | One Arrow per Band Visit (Re-arm at Middle Line) | true (default) = after one turn below (or above) the band, the next arrow on that side needs price to come back to the middle line first. This avoids a row of arrows in a strong trend. false = every turn can get an arrow. |
| 8 | Candles to Draw | How many recent candles get bands and arrows. Default 300. Higher values show more history but make the chart heavier. |
| 9-11 | Draw Chart Bands / Draw Higher Timeframe Bands / Draw Arrows | Show or hide each drawing (all true by default). Hiding a drawing does not change the signals, alerts or buttons. |
| Market Scanner Settings | ||
| 12 | Show Market Scanner | true (default) = show the scanner under the buttons. false = no scanner and no alerts from other symbols. |
| 13 | Symbols (Comma Separated) | The symbols to scan, without any broker suffix, separated by commas. Up to 30. Default EURUSD,GBPUSD,USDJPY,USDCHF,USDCAD,AUDUSD,NZDUSD,EURJPY,GBPJPY,EURGBP,AUDJPY,XAUUSD.Example: EURUSD,GBPUSD,XAUUSD. Wrong: EURUSD; GBPUSD (semicolons are not separators). |
| 14 | Symbol Suffix (Blank = Same as This Chart) | Your broker’s symbol ending, e.g. .a or m. Blank (default) = the EA copies the ending of the chart symbol (EURUSD.a -> .a). If a row shows not offered, check the exact names in Market Watch. |
| 15 | Arrow Counts as Recent for (Candles) | How many closed candles a scanner row keeps showing an arrow. Default 5. |
| 16 | Alert on Arrows of Other Scanned Symbols | true (default) = an alert (with the methods in settings 30-33) when a scanned symbol gets a new arrow, e.g. FRZ Extreme Reversal System: GBPUSD H4 - SELL arrow at 1.29512. |
| Trade Settings | ||
| 17 | Lot Size Mode | Fixed Lot Size (default): every trade uses the lot size in the box. Risk % of Balance: the lot size is calculated so the stop loss would lose the risk % in the box. Risk % needs a stop loss; with Stop Loss Mode None, setting 18 is used. Example: balance $1,000, risk 1% = $10, stop loss 45 pips on EURUSD (about $0.10 per pip per 0.01 lot) -> 0.022 lots, rounded down to 0.02. |
| 18 | Fixed Lot Size | The lot size shown in the box when the EA is attached (Fixed mode). Default 0.01. |
| 19 | Risk % per Trade | The risk % shown in the box when the EA is attached (Risk % mode). Default 1.0. |
| 20 | Stop Loss Mode | Beyond the Last 2 Candles (+ Buffer) (default): below the lowest low (buy) or above the highest high (sell) of the last 2 closed candles – the arrow candle and the one before it – plus the buffer in setting 21. ATR Multiple: setting 22 x ATR from the entry. None: no stop loss. |
| 21 | Swing Stop Buffer (x ATR) | Extra distance beyond the swing level, as a multiple of the ATR (setting 26). Default 0.5. |
| 22 | ATR Stop Loss (x ATR) | Stop loss distance for ATR Multiple mode, and the fallback for swing mode when price is already beyond the swing level. Default 1.5. |
| 23 | Take Profit Mode | Reward:Risk Multiple of the Stop Loss (default): setting 24 x the stop loss distance. Band Middle Line: the current middle line (a safer, closer target; no take profit if price is already past it). ATR Multiple: setting 25 x ATR. None: you close the trade yourself. |
| 24 | Reward:Risk (x Stop Loss) | Default 2.0 = the take profit is twice as far as the stop loss. |
| 25 | ATR Take Profit (x ATR) | Take profit distance for ATR Multiple mode. Default 3.0. |
| 26 | ATR Period | Number of closed candles for the ATR (average true range) used by the stop loss, take profit, break even and trailing settings. Default 14. |
| 27 | Auto Break Even at Profit (x ATR, 0 = Off) | When a trade is this many ATRs in profit, its stop loss moves to entry + 1 pip. Default 0 (off). Example: 1.0 with an ATR of 30 pips -> break even at 30 pips profit. |
| 28 | Trailing Stop (x ATR, 0 = Off) | Once a trade is this many ATRs in profit, the stop loss follows price at this distance and only moves forward. Default 0 (off). |
| 29 | Max Drawdown % (Closes This EA’s Trades, 0 = Off) | When the floating loss of this EA’s trades on this chart reaches this % of the balance, all of them are closed. Default 20. 0 = off. Example: balance $1,000 and setting 20 -> the trades close at a $200 floating loss. |
| Alert Settings | ||
| 30 | Popup Alert on New Arrow | true (default) = a MetaTrader alert window when a new arrow appears, once, when its candle closes, e.g. FRZ Extreme Reversal System: EURUSD H4 - BUY arrow at 1.08300. |
| 31 | Sound Alert | true = play a sound with each alert. Default false. |
| 32 | Push Notification | true = the same message to the MetaTrader app on your phone. Default false. Set up your MetaQuotes ID first in Tools > Options > Notifications. |
| 33 | Email Alert | true = send the message by email. Default false. Set up the email account first in Tools > Options > Email. |
| Misc Settings | ||
| 34 | Magic Number | An ID number the EA writes on its trades so the buttons manage only their own. Default 8740. If you attach the EA to two charts of the same pair, give each a different number (e.g. 8740 and 8741) so their Close buttons do not close each other’s trades. |
Set Files
FRZ Extreme Reversal System does not use .set files. The defaults are already made for H4 charts, and the values that depend on you (lot size or risk, scanner symbols and your broker’s suffix) are different for every account, so a fixed .set file would not reflect the correct values for your account. Use the Input Settings table above as your starting configuration instead.
Troubleshooting
| Issue | What to check |
|---|---|
The panel shows Signal: loading history or D1 extreme: loading D1 history |
MetaTrader has not downloaded enough candles yet (the bands need about 500). Open a D1 chart of the pair once, scroll back a little, wait a few seconds and go back. |
| No arrows on the chart | Normal – this is a swing system, and arrows only appear after price was stretched far enough. Check that Draw Arrows (setting 11) is true. For more arrows set setting 4 to false or lower setting 6. |
| No gold lines on the chart | The D1 bands are usually far from price. Zoom out or scroll the price scale. They are not drawn on D1 or higher charts. |
| Old indicators or arrows still on the chart | Remove the previous version’s indicators from the chart (right-click the chart > Indicators List > Delete). This EA needs no indicator files. |
Scanner rows show not offered |
Your broker uses different symbol names. Compare with Market Watch (right-click > Show All) and fix setting 13 or 14. |
The buttons do nothing / Last: Buy failed, error 4109 (MT4) or a retcode (MT5) |
AutoTrading / Algo Trading is off, or live trading is not allowed on the EA’s Common tab. Other numbers come from your broker, most often not enough margin, the market is closed, or trading is disabled for the symbol. |
..., stops not set (error ...) |
The trade opened, but the broker rejected the stop loss / take profit. Set them manually in the trade’s Modify window. |
| Nothing is drawn in the Strategy Tester | Drawings and the panel only appear with Visual mode ticked. The scanner and alerts do not run in the Strategy Tester. |
| Settings look wrong after updating the EA | MetaTrader can keep old input values when a new version is attached. Remove the EA from the chart, attach it again and click Reset on the Inputs tab before changing any setting. |
Get Support
Online AI chat: https://t.me/FRZSupportBot
Discord Forum: https://www.frzsoftware.com/discord
Useful Links
Recommended VPS: https://www.frzsoftware.com/getvps
Join VIP Club: https://www.frzsoftware.com/vipclub
Social Links: https://www.frzsoftware.com/socials
Disclaimer
Our software is provided “as is”, without any warranty or condition of any kind, express, implied or statutory. You are advised to do necessary testing on demo accounts before using the software on a live account. Trading carries a high level of risk to your capital and you should only trade with money you can afford to lose. Past performance of any trading system is not necessarily indicative of future results.