
FRZ Account Recovery EA – User Manual
- Related Product: FRZ Account Recovery EA
- Browse Similar Tools: Account Recovery & Protection
FRZ Account Recovery EA will initially open a hedging trade with a lot size equal to the total lot size of the on-going trades in order to lock the current loss. Then it will start to recover the total hedged amount (or the drawdown) part by part as per the settings by opening recovery trades on a smaller lot size in a grid system without martingale. Therefore you need to have enough margin in your account for opening hedge trade and the recovery trades. If not you may have to make an additional deposit as required. Always do a back test simulating your existing drawdown before you work with the real account.
Video Introduction (This is based on the first version)
NB: This EA can be used only if your broker allows hedging because the EA uses hedging and also grid trading in DCA mode. If you are currently trading with an EA, you will need to stop the existing EA before you use our EA. You may run out of margin if the price is regularly changing directions. Always try to increase the leverage to the highest provided by your broker. Please do your backtesting and identify the most reliable settings before you actually use it on a live account.
Once you load the EA, do not close it until it is fully recovered. In case EA gets closed while in the recovery process, you will need to close all the hedging and recovery trades manually and start again from the beginning.
Timeframe for the EA: You can use any timeframe for the EA, the lower the timeframe, the more aggressive it would be. Typically, we recommend you use it on the same timeframe you were trading or on a shorter timeframe such as M5 or M15. But always, do backtesting on different timeframes with simulated drawdowns before you select the right one.
EA can close the other EAs up to reaching the specified drawdown. With this functionality, you can load the recovery EA to a single chart and then upon reaching the recovery drawdown level, our EA will automatically close the other EAs and then start the recovery process. Please note that our EA looks at only the pair to which the EA is attached to calculate the drawdown (not the account drawdown but pair drawdown). So, if you have trades in multiple pairs, then it is better to have this option disabled.
Installation Steps
1. Go to MetaTrader>Options>Expert Advisors, tick “Allow automated trading” and allow the following URLs under options:
- https://frzserver.com
2. Copy and EA to the MetaTrader Expert folder
3. Restart/refresh your MetaTrader
4. Load the EA to any chart on MT4/MT5
5. Change the settings as necessary
EA Specifications
| Product name | FRZ Account Recovery EA |
| Platform supported | MT4 or MT5 |
| Time frames supported | Any |
| Trading pair | Any |
| Suitable market sessions | Works on any session |
Settings
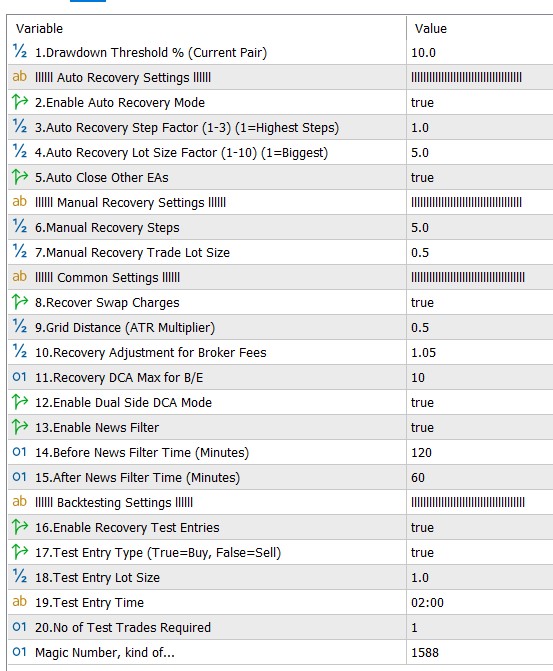
Settings Explanations
1.Drawdown Recovery Threshold % (Current Pair)
This is the drawdown level that activates the recovery module (use it without “%” sign). Please note this considers only the current symbol drawdown (to which the EA is attached) not the account drawdown. This is calculated as follows: Current loss from the current pair/Account balance x 100%.
In other words, EA works for the symbol/pair it is attached. Thus, symbol drawdown could be lower than the account drawdown.
Although you can use this with any drawdown, we recommend to have this value to be less than 40% as it higher drawdowns would need a large remaining margin. You can do your backtesting before you actually try it on the real account.
llllll Auto Recovery Settings llllll
2.Enable Auto Recovery Mode
You can enable or disable auto recovery mode here. If enabled, A will decide the optimal steps and lot size subject to any modifications with other settings.
3.Auto Recovery Step Factor (1-3) (1=Highest Steps)
This is an optional setting for auto recovery mode. EA tries to recover the loss piecemeal. For instance, if you have a drawdown of USD 1000, EA will try to recover the total loss part by part and close the original trades and the hedge trade once the hedge loss is fully recovered. You can adjust the no of parts to some extent with this setting. You can have 1 to 3 here. This is only a adjusting gauge and the number does not reflet the absolute no of steps. (1 = higher no of steps while 3=lower no of steps).
4.Auto Recovery Lot Size Factor (1-10) (1=Biggest)
This is an optional setting for auto recovery mode. You can have 1 to 10 here. This setting will affect the lot sizes of the recovery trades (1 = higher lot size while 10=lower lot size).
5.Auto Close Other EAs
If this is enabled, the EA will close other charts/EAs on your platform. With this functionality, you can load the recovery EA to a single chart and then upon reaching the recovery drawdown level, our EA will close the other EAs and then start the recovery process. Please note that our EA looks at only the pair to which the EA is attached to calculate the drawdown (not the account drawdown but pair drawdown). So, if you have trades in multiple pairs, then it is better to have this option disabled.
llllll Manual Recovery Settings llllll
These two manual settings will apply only if the auto recovery mode (setting 2) is disabled (i.e. set as false).
6.Manual Recovery Steps
EA tries to recover the loss piecemeal. For instance, if you have a drawdown of USD 1000, then if you have 5 under Recovery Steps, EA will try to recover the total loss in 5 parts of USD 200 each. Here you can set the no of steps manually. Higher the steps, the part of the loss to be recovered in a step would be smaller.
7.Manual Lot Size for Recovery Trades
This is lot size for recovery trades that you set manually as per your needs.
llllll Common Settings llllll
These settings will apply to both auto and manual modes.
8.Recover Swap Charges
If this is set as true, EA will add the swap charges of the existing trades to the amount to be recovered. Please note if the recover process takes days there may be a significant costs arising from swaps.
9.Grid Distance (ATR Multiplier)
This is the grid/DCA distance for the recovery trades. This distance is used an an ATR multiplier (not as pips). For instance, if the current chart’s 14-period ATR is 10 pips and you have 0.5 under this setting, new recovery trades will be opened with a minimum 5 pips distance. However EA will not open recovery trades at each 5 pip gap. Instead, it will decide the optimal places where recovery trades should be opened.
10.Recovery Adjustment for Broker Fees
Here you can adjust the recovery amount for any potential broker commissions/slippage (other than swaps). Usually trading commissions, slippage, spreads, etc. can impact the total amount recovered and then the total amount recovered can be less than the actual drawdown amount. This setting can be used to minimize this difference. For instance, if you want to increase the amount to be recovered by 1%, then you need to set this as 1.01. If you want to increase it by 5%, then set this as 1.05.
11.Recovery DCA Max for B/E
If the no of recovery trades goes over this number, then the EA will try to close the those recovery trades at breakeven without waiting for the recovery step amount in order to minimize the risk. Please note this does NOT limit the no of recovery trades.
12.Enable Dual Side DCA Mode
If you enable this DCA recovery trades can be opened on both sides of the grid. This could increase the no of DCA grid trades opened but can speed up recovery process.
13.Enable News Filter
Here you can enable or disable the news filter (This is disabled in the demo version).
14.Before News Filter Time (Minutes)
EA will not make new DCA/grid trades during this period before the red news.
15.After News Filter Time (Minutes)
EA will not make new DCA/grid trades during this period after the red news.
llllll Backtesting Settings llllll
These settings only applied for backtesting.
In order to back test a drawdown recovery, you first need to simulate a drawdown. The EA can open test trades for testing the suitable settings for recovery. For this purpose, you can open a test trade/s with a specified lot size without take profit or stop loss and then wait till the drawdown reaches the specified level so that the recovery mechanism can be tested.
16.Enable Recovery Test Entries
You can enable dummy trades during backtesting with this setting.
17.Test Entry Type (True=Buy, False=Sell)
Here you can set the type of the trades (buy or sell) you need to open to simulate a drawdown.
18.Test Entry Lot Size
Here you can set the lot size for the above test trades.
19.Test Entry Time
Here you can set a time to open the test trades on the backtester.
20.No of Test Trades Required
You can set the required no of test trades here.
Magic Number => You can change this if necessary but not compulsory for our EA.