FRZ Ultimate Grid Maker – User Manual
Installation Steps
1. Go to MetaTrader>Options>Expert Advisors, tick “Allow automated trading” and allow the following URLs under options:
https://faireconomy.media
https://timeapi.io
https://frzserver.com
2. Copy and EA to the MT4/MT5 Expert folder
3. Restart/refresh your MT4/MT5
4. Load the EA to your chart
5. Change settings as necessary
Settings
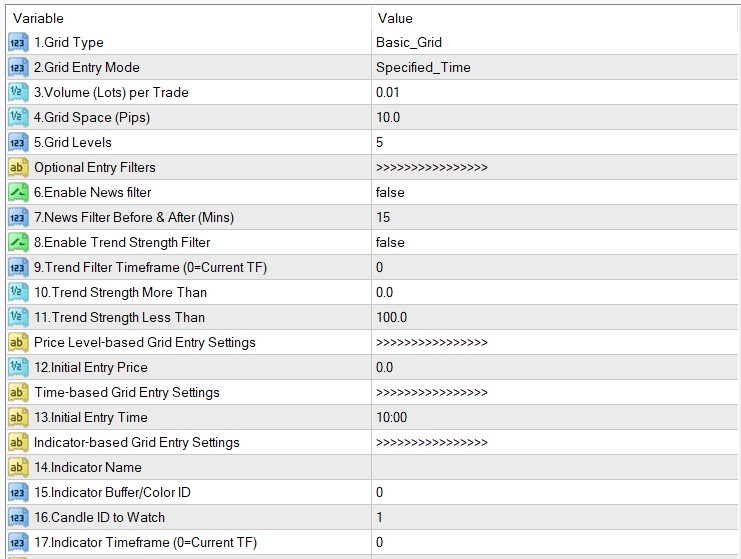
You can select the type of the grid under setting 1 from basic, hedged, bullish trend grid and bearish trend grid.
On the setting number 2, you can select grid entry mode where you get four options.
- Option 1 – Manual entry – in this case you can click on the buttons given on the screen to start the grid at the time or price you like.
- Option 2 – specified price – here you can set a specific price to create the grid automatically.
- Option 3 – specified time – here you can set a time to create the grid automatically. For instance, if you want to start the grid when the London session opens, you can select this option and set the London open time in later setting.
- Option 4 – indicator based entry – under this option, you can use an external indicator signal to start the grid. For instance if you have an indicator that shows an arrow or similar signal for entries you can use that indicator signal for starting the grid. Please note only the indicator’s default settings can be used for this purpose.
Under setting 3, you can set the trading volume per trade.
Under setting 4 and 5, you can set the grid space in pips and the number of grid levels respectively.
Then you get some entry filters. Under setting 6 and 7, you can enable and set the news filter as per your liking. Please note the news filter is not used in manual mode.
Under settings 8, you may use the trend strength filter, which is a variant of the ADX indicator. Since the grid systems’ profitability could depend on the type of the market, this can be a useful option. Higher trend strength means more trending market and lower trend strength means ranging market. Usually trend strength above 20 is considered trending and less than 20 is considered to be ranging markets. For instance if you are using the hedged grid system, then you would need a ranging market. So you can set the setting 11 as 20 or less so that the EA will not trade unless trend strength is lower than the given value.
On the other hand if you are using a trend based grid system, you would want a trending market. In that case you may set the setting 10 as 20 or more then the EA will only start the grid if the trend strength is more than the given value. Also on setting 10, you can also set the timeframe to check this trend strength if required. You need to set the time frame in minutes here and zero means the current timeframe. For instance, assume you are setting up the grid on M15 timeframe but you want to make sure M30 chart is ranging or trending, then simply put 30 under setting 10. However please note that MT4 does not allow backtesting with multi time frames but you can use a different time frame on live trading. However, MT5 allows backtesting with different timeframes.
In case you selected the price level based entry, then you can set the price under setting 12.
In case you selected the time based entry, then you can set the time under setting 13.
In case you selected indicator based entry, then you can add the indicator name, its buffer or color ID of the signal, candle ID to watch and the timeframe for indicator under settings 14 to 17. Color or buffer ID can be found under the Colors tab of the indicator settings. By default the EA will look at the last completed candle for any entry signal which you may increase if your indicator shows the indicator later than the last candle.
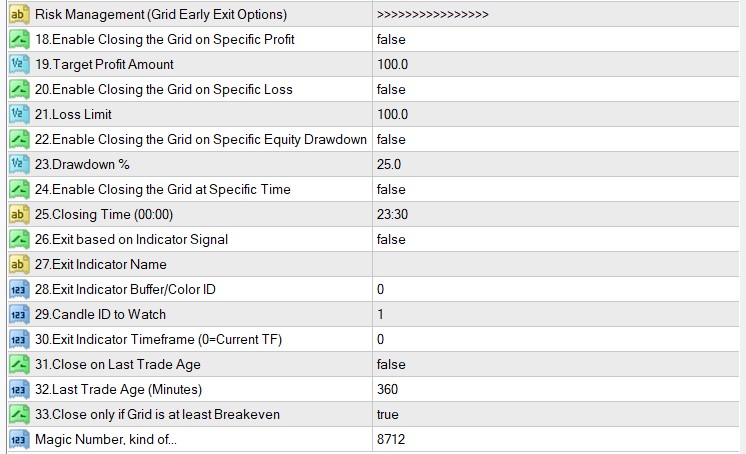
The risk management options will allow the user to close the grid before all the orders are closed by take profit if it appears the grid is not going to end in the way we intend so that we can mitigate the risk.
You can close the grid upon reaching a certain profit or loss level under setting 18 to 21.
Then you get the option to close the grid if your account reaches a certain equity drawdown percentage under setting 22 and 23.
Then you have the option to exit the grid at some specific time under setting 24 and 25. For instance you can close the grid at the end of the day if you enable this and set time to 23:59.
And also you have the option to close the grid based on an indicator signal. The indicator setup is similar to the entry indicator signal. You can simply add the indicator name, exit buffer number, candle ID to watch for the signal and the timeframe for the indicator under settings 26 to 30.
And finally you have the option to close the grid based on the age of the last opened trade under setting 31 to 33. If a trade is going the other way and taking a lot of time while increasing drawdown, then it may be a better idea to exit the grid. You can simply enable this and then set the time in minutes. And you also have the option to close the grid under this scenario only if the grid has at least reached a breakeven level. indicator for this test. For the purpose of this video we will use doing a backtest. What we want is to start a bullish trend based grid when a bullish signal is generated by our indicator. As you can see our buffer or color ID for the buy signal is 2 so we need to update this number under settings. Also we need to select the bullish trend based grid. For simplicity let’s keep the default grid levels, space and lot size and set the EA for the indicator.