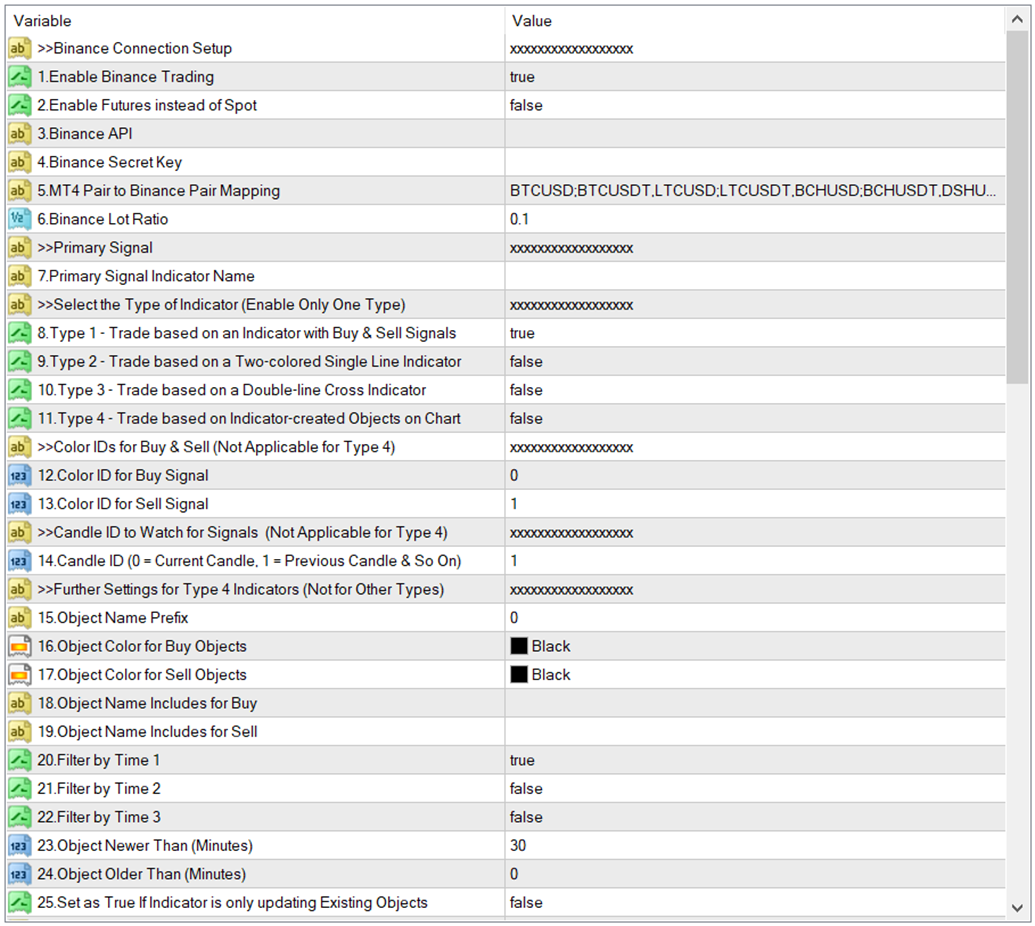
- Enable Binance Trading
Under this you can enable and disable Binance trading. If you disable this, trades will not be copied to Binance.
- Enable Futures instead of Spot
You can select either the Binance spot or futures market with this setting.
- Binance API
Here you need to add your Binance API.
- Binance Secret Key
Here you need to add your Binance Secret Key.
- MT4 Pair to Binance Pair Mapping
You need to map your MT4 crypto pair to Binance crypto pair here. The format is MT4 pair followed by semicolon and then corresponding Binance pair. You can add more than one pair mappings separated by commas.
Example: BTCUSD;BTCUSDT,LTCUSD;LTCUSDT,BCHUSD;BCHUSDT
- Binance Lot Ratio
Binance lot ratio can be used to proportionally increase or decrease the volume on Binance from MT4 volume. This is particularly useful to reduce the lot size on Binance as the lowest lot size on MT4 is 0.01 lots while 0.01 lot on a crypto like BTCUSD could involve a considerable amount.
Example: Your MT4 lot size is 0.01 (Setting 26) while lot ratio is 0.1. In this case, if you buy BTCUSD 0.01 on MT4, the corresponding trade on Binance would be 0.001 lots (i.e. 0.01×0.1).
- Primary Signal Indicator Name
You need to add your indicator name here. This is the main signal indicator for buy and sell signals.
You need to have the indicator name exactly as per indicator file name (no need to have the ex4 file extension). Further, if your indicator is NOT directly within the MT4 indicators folder (i.e. if it is in a subfolder within the main MT4 Indicators folder), you need to add the indicator name along with the folder path. For instance, if your indicator name is “Candle Stick Reversal Indicator” and the indicator is located in the “Market” sub-folder within the main MT4 Indicators folder then you need to enter the indicator name as follows:
Market/Candle Stick Reversal Indicator
NB: Entering indicator name is not necessary for object-based indicators because Automater is simply reading the objects on the chart created by the indicator.
- To 11. Select the type of the indicator you want to use
As explained before, there are 4 types of indicators that can be automated with our EA. The First 3 types use indicator color IDs or buffer numbers while the 4th type is based on indicator created objects. You need to enable the right type. Please make sure only one type is enabled and the other three are disabled.
- To 13. Color IDs (Buffer Nos) for Buy & Sell (applicable for Indicator Type 1 to 3)
You need to identify the correct color IDs for the buy and sell signals respectively.
NB: these settings are not applicable for object-based indicators as we are not using color IDs for such indicators).
- Candle ID (Applicable for Type 1-3 Indicators only)
This is the candle ID that the EA looks for possible signals. “0” means the current forming candle and “1” means the previously completed candle and so on. For instance, if you have “1” here, the EA will always look at the immediately completed candle for any buy or sell signals. Most indicators tend to repaint within the current candle and therefore you need to be careful in using “0” here. If your indicator is heavily repainting, then you may consider increasing the candle ID. However, on the other hand, this may lead to delayed trade entries.
Object-based Indicator Settings – Applicable only if you use objects
A chart can have many objects on it. But the EA needs to distinguish the buy and sell signal objects from other objects to avoid conflicts. This is done through
- an object name prefix + respective buy & sell colors or
- distinguishable text for buy and sell objects
Using a common object name prefix with different object colors for buy and sell
- Object Name Prefix
In this method, the indicator objects need to have a predefined prefix for identification. This prefix can be one or a few initial characters which are present in every buy/sell object that the indicator makes.
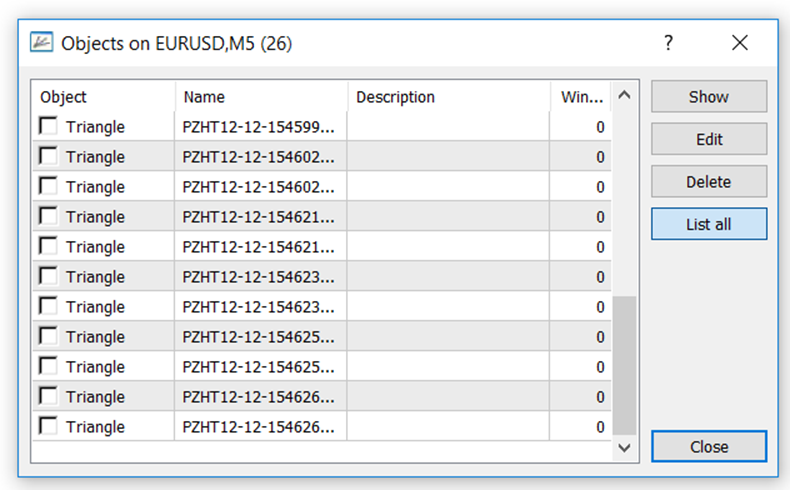
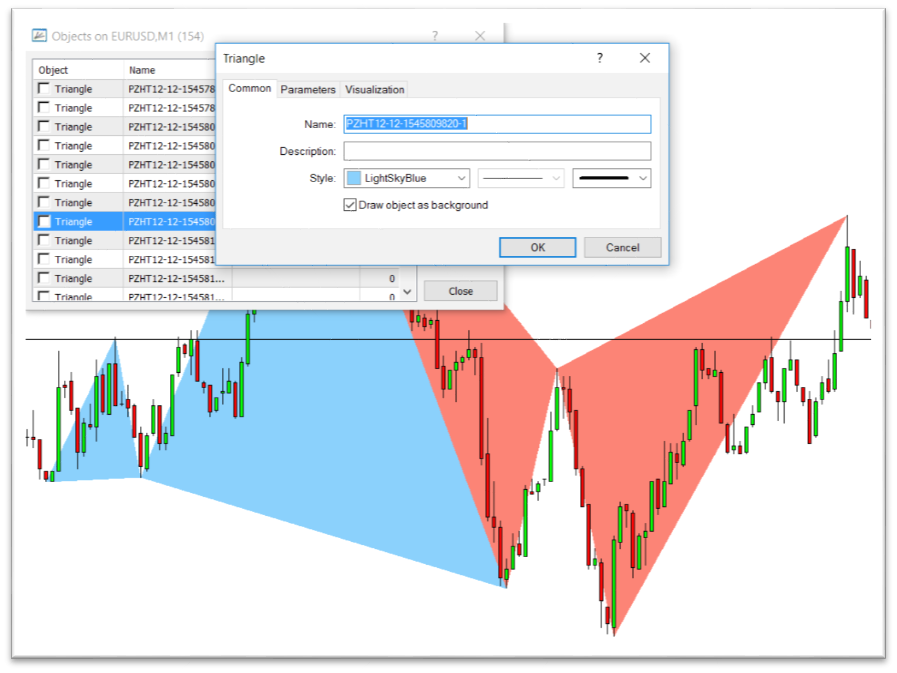
Example: The below is from an indicator that creates blue and red triangles as sell and buy signals respectively. If you look at the objects created by this indicator as given below, you will notice that all the objects have the prefix “PZHT12”, so this part can be used under Setting 15. The idea here is to distinguish the buy and sell objects from other objects so that the EA can use them for trading.
Now we have identified the buy and sell signal objects with a common prefix. The next step is to distinguish between buy and sell which is done by the respective object colors.
- Object Color for Buy Objects
You need to select the right color of the buy signal object. No other indicator must be generating objects with this color with the same name prefix to avoid confusion. You may change the colors to have unique colors for the selected buy signal if your indicator has customizable colors.
You can find the objects colors by: right click on an MT4 chart area, click on “Objects List”, and select the required Object. The color can be found in the “Style” setting under the “Common” tab of the object properties.
- Object Color for Sell Objects
This is the opposite of the previous setting. Set the correct color of the sell signal object.
Example: given below are the objects from a Harmonic pattern indicator, which creates triangle objects on the chart on the finding of harmonic patterns. You need to select the “LightSkyBlue” color under the buy signal with this object.
Using a common object name “includes” with different object colors for buy and sell
In this method, your objects need to have distinguishable text/number for buy and sell signals. This can be a prefix, suffix or text/number in the middle.
Example 1: An indicator creates objects whose name can be xxxxB123xxx for buy objects and xxxxxS123xxx for sell signals. Here you notice that B123 and S123 can be used to distinguish buy and sell objects.
Example 2: An indicator creates objects whose name can be xxxxx0-01 for buy objects and xxxxx0-02 for sell signals. Here you notice that 0-01 and 0-02 can be used to distinguish buy and sell objects.
Example 3: An indicator creates objects whose name can be trend1xxxxx for buy objects and trend2xxxxx for sell signals. Here you notice that trend1 and trend2 can be used to distinguish buy and sell objects.
- Object Name Includes for Buy
This is where you add the buy signal common text as discussed above.
- Object Name Includes for Sell
This is where you add the sell signal common text as discussed above.
Once we identify the objects for buy and sell signals we can further use time filters to identify the most recent and tradeable objects.
- To 22. Filter by Time
When you first load the EA on to the chart, the chart may load objects created based on the past candles. However, EA needs to ignore the past indicator objects and not open trades on past objects. You can set a period so that only the objects created within a specified period to the past from the current time can be used to make trades. This time will be with reference to the time of the object. However, an object can have up to 3-time points.
For instance, a triangle would have 03-time points and a rectangle would have 02-time points while an arrow would have only one time point. You need to decide which time point that you are going to use to filter the objects by time. Generally, if there are more than one time points for your object, then you need to use the latest time point.
You can find the objects by right-clicking on the MT4 chart area, click on “Objects List”, and select the required Object. The time points can be found under the “Parameters” tab of the object properties.
Example: Time points in a triangle object.
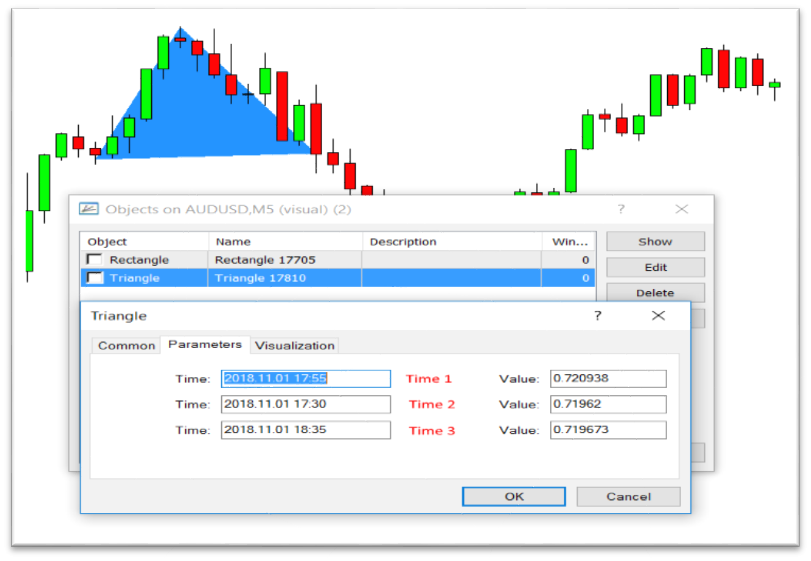
You should have only one time point as “true” out of the three and the other two should be “false”. The one you set as true will be the reference time for filtering past objects.
- Object Newer than (Minutes)
This is the time filter discussed before. The time is in minutes. For instance, if you use “5” here, that means objects created within the last 5 minutes with reference to the object time will be considered by the EA for entering into trades. Generally, it is recommended to use twice the time of your timeframe. For instance, if you are using the EA on a 5-minute chart, then it is better to have 10 minutes here. However if your objects are created later than that, you may have to increase this time.
- Object Older Than (Minutes)
This is the opposite of the previous setting. Sometimes, objects can be repainting and you may want to wait for little time before trade entry to see if the object disappears. For instance, if you put 10 minutes here, EA will wait 10 minutes after recognizing the object. If you want to enter the trade just as it is recognized, then leave this as “0”.
NB: “Object Older Than” time should always be less than the “Object Newer Than” time. For instance if you add 30 minutes for Setting 23, then you can have 29 minutes or less for this setting.
- Same Object Updated
Some indicators do not generate new objects every time a signal is given. Instead, they only update the existing object. In this case, if you look at the objects, you will see that there are only two objects for buy and sell which are updated as and when new signals are generated. In such a case, you need to set this setting as “true”.
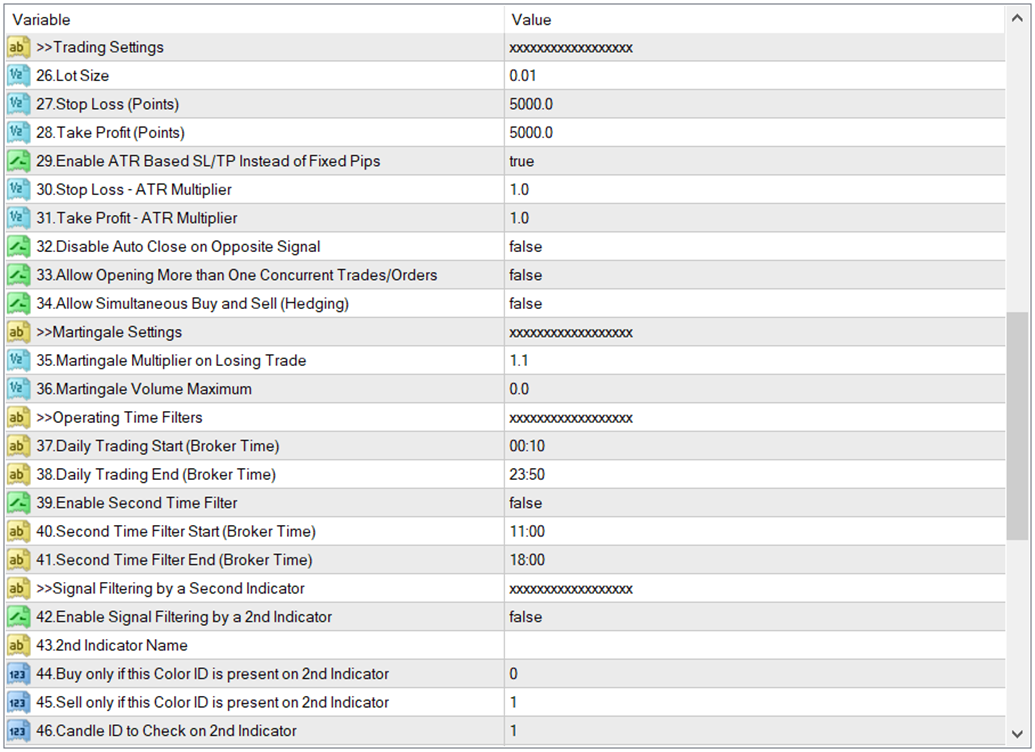
- Lot Size
This is the lot size for the trades. This will be modified by the Binance lot ratio when the trades are copied to Binance as explained before.
- Stop Loss (Pips)
Stop loss setting for trades. You can make it zero if you want to close the trade only on the opposite signal.
- Take Profit (Pips)
You can set the take profit here. You can make it zero if you want to close the trade only on the opposite signal.
- Enable ATR based SL/TP
You can enable this feature here. If you enable here, then stop loss and take profit set in pips previously will be ignored. Instead of fixed stop loss and take profit, you can use ATR distance (14-period Average True Range) to dynamically set the stop loss and take profit.
NB: When you use any setting that would create more than one trade at any given time. The Automater will use the ATR that was used in the initial trade for the other trades created after the initial trades.
- Stop Loss – ATR Multiplier
This is the ATR based stop loss that you can set as necessary. It has to be set as an ATR multiplier. For instance, if you put 2 here, then the stop loss will be two times the ATR distance at the time of entering the trade; if the ATR was 10 pips at that time, then the stop loss would be 20 pips.
- Take Profit – ATR Multiplier
This is the ATR based take profit that you can set as necessary. It has to be set as an ATR multiplier. For instance, if you put 2 here, then the take profit will be two times the ATR distance at the time of entering the trade; if the ATR was 10 pips at that time, then the take profit would be 20 pips.
- Disable Auto Close on Opposite Signal
By default, the EA will close the existing trade when an opposite signal is received. With this option, you can disable this. In that case, the trade will be closed only by TP/SL.
NB: You need to have entry price optimizations (Both setting 81 & 82) disabled in order for this feature to work as the two features are in conflict with each other).
- Allow Opening More than One Trade
By default, the EA will not open multiple trades/orders in the same direction. For instance, when there is a buy trade currently going on and the indicator gives another buy signal, the EA will not open another buy trade but it will simply keep the existing buy order. However, if you set this setting as “true”, then the EA will open more than one trade or order in the same direction. (Also note that if you disable auto close on opposite signals from above setting as “true”, then there can be more than one trade in both directions as EA will not close the trade on opposite signal).
NB: You need to have entry price optimizations (Both setting 58 & 59) disabled in order for this feature to work as the two features are in conflict with each other). Further, do not use this option with line indicators which may cause trades being created on every bar/tick.
- Allow Simultaneous Buy and Sell
The previous setting enabled more than one trade at any given time but only in the initial direction. But if you like to have trades on both sides (both buys and sells at the same time), you need to enable this setting. NB: In other words, this will enable hedging (having trades both ways at the same time).
>>Martingale Settings
The EA facilitates martingale. That means you can increase the lot size for the next trade whenever you lose a trade.
NB: Martingale can be risky and it can blow your account quickly if you face a series of losing trades. Therefore, you need to be cautious when using martingale.
- Martingale Multiplier on Losing Trades
By default, this setting is set to 1. This causes the option value to be multiplied by just 1 and that means there is no martingale and the lot size is fixed by default. If you want to use martingale, you can increase this number as required. For instance, if you use 2 in this setting, then the lot size will be doubled every time you lose a trade. And the option value will be reset to initial value when you end up winning a trade.
- Martingale Volume Maximum
This is the maximum volume the EA would trade if the martingale option is used. This will work as an upper limit for the martingale option. Use “0” here if you do not want to use an upper limit.
- To 41. Operating Time Filters
There are two time filters you can set. Second time filter is optional and can be enabled/disabled. For instance, if you want the EA to work only during two particular forex sessions, you can easily set those two sessions start and end time so that the EA will work only during those times. Please note the time here is the broker time (in other words, your MT4 chart time).
>> Signal filtering by a second indicator
The EA facilitates the signal generated by your main indicator to be filtered by a second indicator. Please note only buffer/color ID-based indicators can be used as the second indicator.
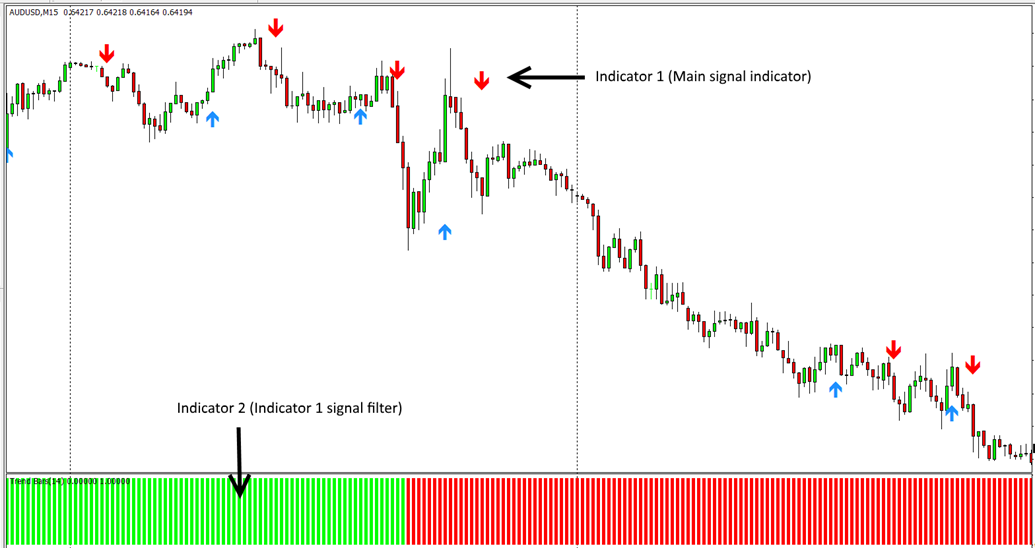
Please look at the below example screenshot to understand this feature. Indicator 1 is your main indicator that generates buy or sell signals. And the second indicator (Trend Bars Indicator) is an indicator that shows the overall trend of the market. If you want to consider the buy and sell signals only when the overall market trend agrees with the signal (or even the opposite happens), you can use this feature to achieve that objective.
NB: You can use any suitable indicator as the second filtering indicator, preferably one that provides continuous signals that is always present; thus an arrow based indicator may not be suitable for this. Also, note that the EA will only consider the default settings of your second indicator too.
- Enable Signal Filtering by a 2nd Indicator
This is where you enable the signal filtering by a second indicator. Please note you can only use buffer/color ID-based indicators for this purpose as mentioned before.
- Second Indicator Name
You need to type the second indicator name exactly as per the indicator file name (no need to have the ex4 file extension). Further, if your indicator is NOT directly within the MT4 indicators folder (i.e. it is in a subfolder within the Indicators folder), you need to add the indicator name with the folder path. For instance, if your indicator name is “Trend bars” and the indicator is located in the “Market” sub-folder within the main MT4 Indicators folder then you need to enter the indicator name as follows: Market/Trend bars
- Buy only if this Color ID/buffer No. is present on 2nd Indicator
This is the buffer number to see if it’s present for buy trades. (In other words, this is the Color ID of the second indicator to be used as a filter for the first indicator’s signals for buy trades).
Let’s check out the below screenshot for an example for a second indicator. This is the buffer setting screenshot for previously mentioned Trend Bars Indicator.
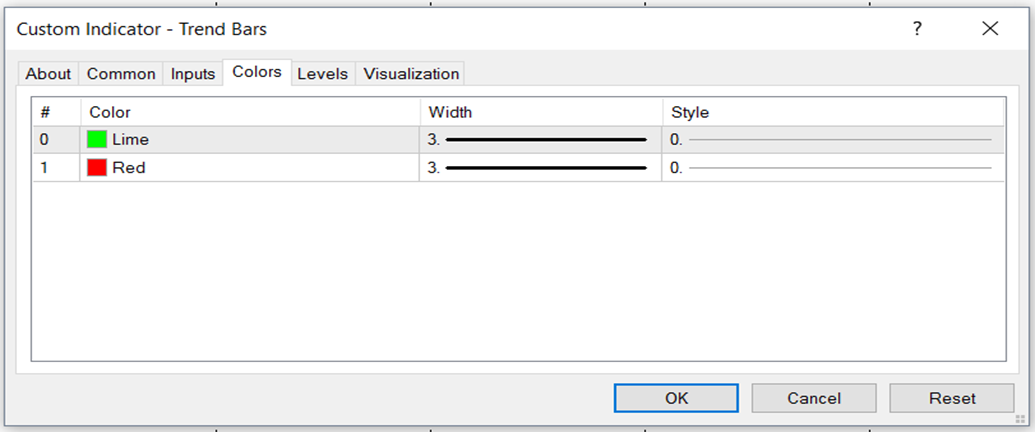
Here the bullish trend is shown by Color ID “0” while the bearish trend is shown by Color ID “1”. So if you want to enter buy trades on your first indicator only when the market is in an overall bullish trend indicated by the second indicator, you need to have “0” under this setting. (Also note that if you need, you can use “1” as well. In that case, you will be entering buy trades when the market is in an overall bearish trend).
- Sell only if this Color ID/buffer No. is present on 2nd Indicator
This is the buffer number to see if it’s present for sell trades. (In other words, this is the Color ID of the second indicator to be used as a filter for the first indicator’s signals for sell trades).
- Candle ID to Check on 2nd Indicator
This is the candle ID to look at in the second indicator to see if the filtering Color ID is present. It can be anything from “0” onwards. “0” means the current forming candle and “1” means the immediately completed candle and so on. Please note that the current candle can be repainting in most indicators and be careful in using “0” here.
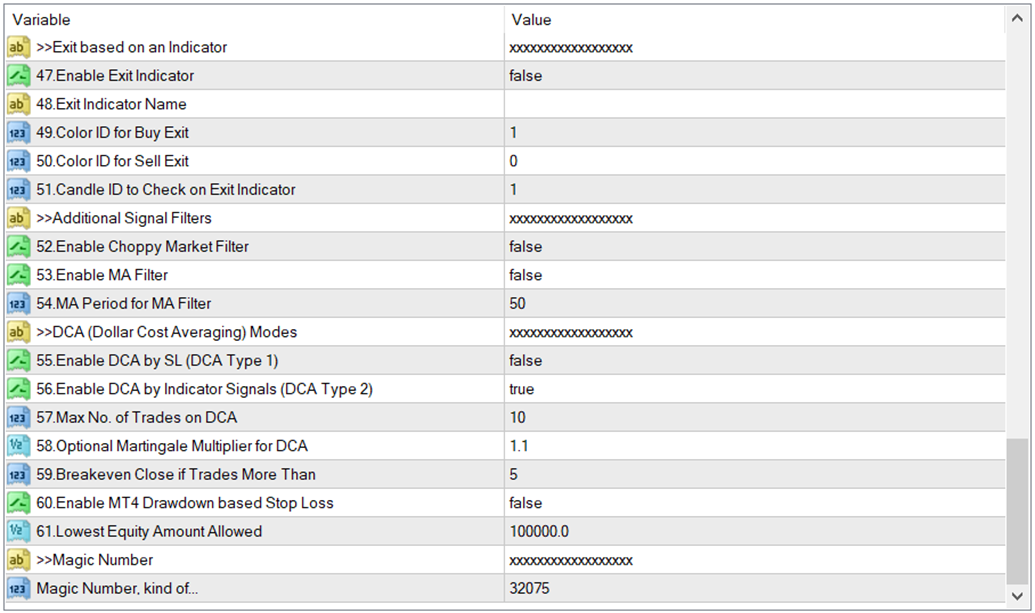
>> Close Trades Based on an Exit Indicator
In addition to stop loss or opposite signals, you can also set the trades to close based on another indicator. This exit indicator uses the values of the buffer/color IDs to close the trades. For instance, you can use a different arrow indicator that provides some kind of exit signals based on buffers/Color IDs to close trades. Please note you can only use an arrow-type buffer based indicator that can show exit points for buy and sell.
Please note that exit based on the opposite signal of your first indicator is inbuilt by default (unless you disabled it under setting 32). Therefore, there is no need to add the same indicator here. Please disable entry optimization modules (set Settings 55 & 56 as false) if you want to use an exit indicator.
- Exit trades based on an Exit Indicator
You can enable or disable exit indicator here.
- Exit Indicator Name
You need to type the exit indicator name exactly as per the indicator file name (no need to have the ex4 file extension). Further, if your indicator is NOT directly within the MT4 indicators folder (i.e. it is in a subfolder within the Indicators folder), you need to add the indicator name with the folder path. For instance, if your indicator name is “Candle Exit Indicator” and the indicator is located in the “Market” sub-folder within the main MT4 Indicators folder then you need to enter the indicator name as follows:
Market/ Candle Exit Indicator
- Color ID for Buy Exit
This is the color/buffer ID whose value will be considered for closing buy trades.
- Color ID for Sell Exit
This is the color/buffer ID whose value will be considered for closing sell trades.
- Candle ID to Check on Exit Indicator
This is the candle ID to look at in the exit indicator for the buffer/color ID values. It can be anything from “0” onwards. “0” means the current forming candle and “1” means the immediately completed candle and so on. Please note that the current candle can be repainting in most indicators and be careful in using “0” here.
>> Additional Signal Filtering Options
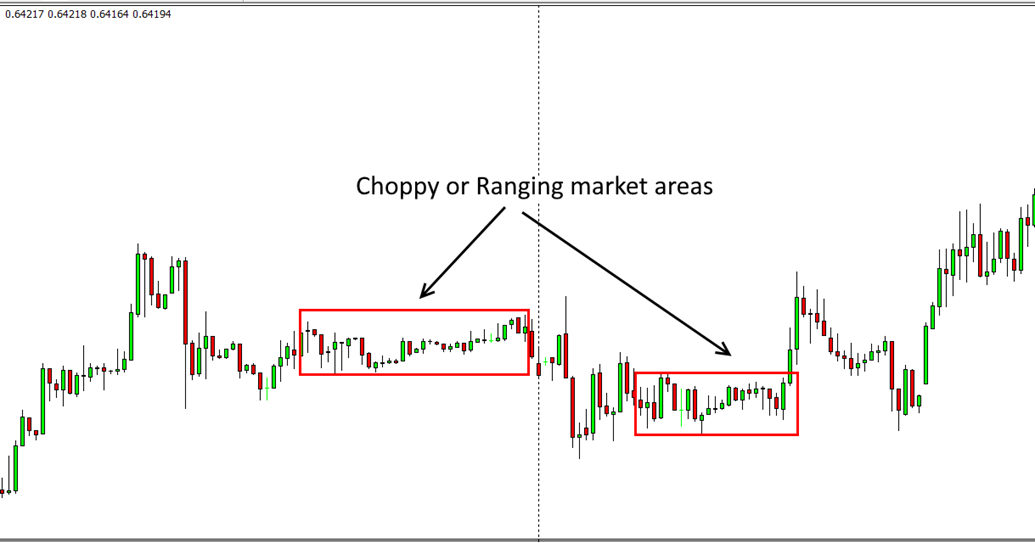
- Enable Choppy Market Filter
You can optionally enable a choppy/ranging market filter where your indicators’ signals will be filtered by the EA. The EA uses its own algorithm to detect choppy/ranging markets and any signals given by indicator during these periods will be ignored by the indicator. Please note that no trades will be opened and no trades will be closed during the identified choppy markets. This feature may be used to increase the accuracy of your indicator.
E.g. Choppy/ranging market areas:
- MA Filter: Signal filtering based on Moving Average Line
You can also filter the signals of your indicator based on an MA line, which can be enabled or disabled here. If you enable the MA filter, your indicator’s signals will be filtered as follows: Buy trade will be executed from a buy signal from your indicator/s only if the price is above the specified MA line at the time of the signal, and vice versa for the sell trades.
- MA Period for the MA Filter
Here you can specify the MA period to be used in above MA filtering.
>>Dollar Cost Averaging (DCA) Modes
With this functionality, you can add to the current position based on a DCA (Dollar Cost Averaging) method along with optional martingale and other features. The additional entries will be based on either signals from the indicator/s (Setting 56) or stop loss level (Setting 55) settings. Please note only one of the two averaging methods should be enabled. If you want to disable averaging module all together both Setting 55 & 56 must be set as false.
Trades are not closed at stop loss level when averaging methods are used (SL is virtual in any case). When a trade does not reach the TP target and price turns the other way, the EA will keep adding more positions on the same direction every time a new signal is given by the indicator or the price reaches the stop loss level, depending on the type of the averaging method selected. When there are more than one trade, the take profit will consider profit of the all existing trades so that the take profit would be closer to the last entry.
- Enable DCA by SL
Here you can enable or disable the averaging system based on stop loss level set in previous settings. The stop loss level can be fixed pips (Setting 27) or based on ATR (Setting 30). When a trade does not reach the TP target and then price turns the other way, the EA will keep adding more positions in the same direction every time the price reaches the set SL distance (based on fixed pips or ATR based). For instance (if you use ATR based SL) if the stop loss was 2x ATR, new trades on the same type will be opened at each 2xATR distance on the opposite direction (subject to filters given later).
- Enable DCA by Indicator Signals
Here you can enable or disable the averaging system based on new signals is given by the indicator/s. When a trade does not reach the TP target and then price turns the other way, the EA will keep adding more positions in the same direction every time a new signal on the is given by the indicator/s on the same direction (subject to filters given later).
NB: You can only use one averaging method out of 55 & 56. Do not have both options enabled. If you want to disable averaging module, you need to disable both 55 & 56.
- Max No of Trades on DCA
You may set a max no. of concurrent trades if necessary to reduce the risk of the averaging module. The Automater will not make new trades after this trade limit.
- Optional Martingale Multiplier for DCA
You can optionally add martingale for additional trades opened under the entry price optimization. For instance if you use 2 here, lot size would be doubled every time when a new trade is added under the averaging module. If you do not want to use any martingale simply keep this number as 1.
NB: Martingale can be risky and it can blow your account quickly if the price continues to the other way. Therefore, you need to be cautious when using martingale. Only a very mild martingale level is added by default which does not significantly increase the risk.
- Breakeven Close if Trades More Than
In an averaging module, getting out of a trade as soon as possible is important because you never know how far the price will go against you and there is a risk of getting margin calls. Therefore, it is safer to get out of a series of positions without the original take profit but without a loss (i.e. at a breakeven) on overall terms. Here you can set that trade number. For instance, if you have 5 here, the Automater will close the trades if the price reaches breakeven level without waiting till price goes to the intended profit level.
- Enable Drawdown based Stop Loss
You can enable a stop loss level based on a maximum drawdown to further reduce the risk of the averaging module if necessary. The drawdown is based on the equity.
- Lowest Equity Amount Allowed
This is the minimum equity level allowed in monetary terms if you have enabled the same in the previous setting.
Magic No.
Magic No.: A magic number on MT4 is a unique number that is used by Expert Advisors to track open positions. You can change the magic number if necessary. But it is not essential to change the magic number on each different chart. You can simply use the same magic number on all charts.